WILINESS III

Atari ST - 1988/1992 - released to the public in 2004
|
 Wiliness 3: How to play the game
1. Introduction

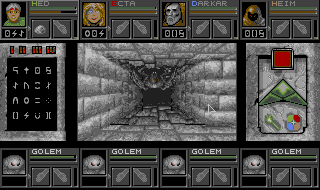
The screen is divided into 4 areas. The top, but also the bottom, represent your team (1).
Even if you start the game with only four warriors, your team can expend up to eight characters.
The middle of the screen is the view and displays what your team actually sees and where
most of the game interaction happens(2). The left area displays all the magic runes known
by your team and also activates spells (3). Finally, the area on the right is the control window and
is used to move your team, but you can also change
characters positions or burn a torch. It also displays inflicted damage.(4)
2. The team
The top row shows your team of four characters. Another row located at the bottom
on the screen displays secondary characters ( see secondary characters ).
|
The character picture is located at the left end of the frame (1), and the small box below
are the active runes used by this character (7). Then his/her name, the first letter
is color coded and is really important in the game (2). Messages will appear
from time to time during the game and their color indicate who is doing the action.
Below the name are displayed Health and Manta bars.(3)
Two icons display the two character hands, the right hand being the active hand (4).
This hand is really important as it is the one holding weapons, throwable objects
or magic items. The Left hand (5) can hold anything too and is also used
to reload weapons like bows.
Finally the bar on the right is the character load (6). Your character will start slowing
down when the bar turns yellow or red.
|
|
 1. Picture
2. Name
3. Health and Manta
4. Right (Active) hand
5. Left hand
6. Load
7. Active spell
|
Active character
There is always an active character. This character is always the one attacking or
picking objects. Just right click on a hero picture to make him or her active. You
can also press the F1 to F8 key to elect a new character.This way
of selecting an active character is really useful during fights.
Secondary characters
Secondary characters are usually magic entities like Golems or cursed monsters.
They will join your team and associate themselves to one character. They can
only hold objects in their hand and you can not revive them.You can also
press a character key twice to elect his or her secondary character, for instance
pressing F1 twice will switch from your first character to his or
her secondary character.
|
|

Secondary characters can be really handy...
|
3. the view

Right click in area 2 to make your active character attack...
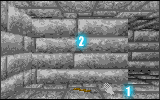
The view represents what you team sees. First of all you can pick objects on the floor.
If you are in a picking area (1) , the mouse icon will turn into a hand. Just click on
an object to pick it up. From there, you can put the object in a character hand, or to
a character inventory by just pressing the right mouse button, this will automatically
open the active character inventory window (see Character Inventory). Wiliness 3
uses a system where objects can be dropped or hidden anywhere around you, so make sure
you always look around ...
If the mouse is above the picking area (2), things are different. If your hand is empty, you can
press anything on screen by using the left mouse button. If you carry an object it will be
automatically used or thrown depending the situation. For instance if you are holding a flask, clicking
a fountain will fill it up with water. But if you are in front of nothing special, it will be
thrown away and will probably break in pieces.
Finally, if you press the right mouse button, your active character will attack. If located in the
front row, he or she will attack. But if located in the back row, he or she will throw the
object hold in his/her active hand, or use it in the case of a bow or magic item like a staff.
4. How to use magic

|
|
Your team usually only know a limited amount of runes. The finished games would have allowed you
to learn new runes but this part never got implemented. The four digits on top of
the rune window are the power of your spells and they go from 1 to 4 (I to IV).
To activate a spell you need to prepare a vocable which is a word composed of three runes.
To create a vocable, you can just use the keyboard and enter the following letters. A spell
will then be created for the active character:
|
A = 
E = 
I = 
M = 
|
|
B = 
F = 
J = 
N = 
|
|
C = 
G = 
K = 
O = 
|
|
D = 
H = 
L = 
P = ?
|
|
The vocable will appear in the box under your character picture. You
can press Backspace at any time to delete your vocable and enter another one.
When your spell is ready just press 1, 2, 3 or 4 to activate it.
More powerful is the spell, and more Manta points will be needed. The strength
of your spell also depends of your Mantacore level.
Read the spell book for the complete list of vocables or
The origins of the Mantacores for more information about the
origines of the runes.
5. The Control window

1. movement control
2. light up a torch
3. change character position
4. hit points
|
|
The control window includes three movement buttons (1). The up button move the party
forward and the left and right button rotate them by 90 degrees. The up, left and
right keyboard keys can also be used and are strongly advised.
The torch control (2) can light up an unlit torch. Just drop a torch there and you do
not have to worry about it anymore until the light goes down again.
The position control allows you to switch character positions (3). Hero position
is really important as characters at the front usually receive full damage. They are also
the ones that fight in close combat.
Finally, the damage indicator (4). Every time you inflict damage, the total
amount of hit points will be shown there.
|
6. The Character Inventory

|
|
1. Main character equipement
2. Backpack equipement
3. Food and Water levels
4. Analyse and Eat
5. Save your game
6. Health and Manta
7. Status
8. Exit inventory
9. Sleep or Pause the game
|
The Character Inventory can be either activated by right clicking in the
picking area of the view, or by clicking on a character picture.
main character equipment (1)
This is where you equip clothing, weapons, armours and special items.
The column below to the right hand is used to reload the left hand. For instance,
if you character is at the back and throwing daggers, just add more of them there and
they will automatically reload when thrown.
Backpack equipment (2)
This is where all the rest of your equipment is stored.
Food and Water levels (3)
Always keep an eye on those levels. Drink water and eat food regularly.
Analyse and Eat (4)
This will ask your character to analyse an item or read a scroll.
Keep in mind that your character intelligence is really important and you
will get different answers depending how clever is your character. Some of
them don't even know how to read...
Finally, just drop food and water on the Eating icon to feed your character.
Save your Game (5)
Click on this icon to save your game.
Health and Manta (6)
Shows your health and manta status
Status (7)
Click here to see your character status and levels.
Exit inventory (8)
Click here to exit the character inventory. You can also at any time
press the right mouse button.
Sleep or Pause the game (9)
Press the Zzz icon to force your team to sleep
and therefore recover energy. The Cup of tee just pause the
game.
7. Special actions
This last section gives you in game information which can be difficult
to figure out. My advice is to stop reading now as some of the clues here
may spoil your adventure...
A. How to revive characters
B. How to climb to another floor using the rope
A. How to revive characters

|
|
When a character dies, his or her body (  ) and
backpack ( ) and
backpack (  ) will drop on the floor.
The two objects hold at the instant of death will also drop.
At this point, the backpack can not be opened, you will have to revive the
character to use the equipment again. The most important parts are the bones and
have to be collected for the character to be revived. ) will drop on the floor.
The two objects hold at the instant of death will also drop.
At this point, the backpack can not be opened, you will have to revive the
character to use the equipment again. The most important parts are the bones and
have to be collected for the character to be revived.
|

|
|
Then you need to find a Reviving Shrine to create a
Reviving Mixture. Take a rock and put it in the shrine, this
will automatically create a Reviving Mixture (  ). ).
This mixture is very unstable and can not be dropped on the floor or stored in
your equipment.
|

|
|
Then finally drop the Reviving Mixture over the character's bones.
The character should now be revived. Still you will notice you can
not look at his/her equipment anymore. This will be locked until
you give his/her backpack back.
(nb. Reviving shrines have many more secrets but I leave
you to find them on your own...)
|
B. How to climb to another floor using the rope

|
|
Here is a typical situation, the only way to go from a level to
another is to climb through trap doors. If you just step on them,
you will fall and damage your team, and you will have no way to
go back. The only way if to use the rope (  ). ).
|

|
|
First of all, make sure that your active character has the
rope in his/her right hand. Make sure you keep this character active !
|

|
|
You now can step on the trap and you will not fall anymore.
Just click on the trap to go down.
You can use the same method to climb up again.
|
WILINESS III is ©1988,2004 - Laurent KERMEL
|
|